Translate

What is Ajax and jQuery?

We are going to cover key techniques in producing a rich web application to enhance the user experience with Ajax and jQuery. Ajax stands for Asynchronous JavaScript and XML. This is a model which allows us to make requests to server in background from client side code (JavaScript). It enables us to update the page without reload the page completely which greatly improve performance of our web site and user experience. In addition to the controllers, there is a new technology called WebAPI which is designed to ease transport of
information over HTTP.

The important thing about Ajax that it is asynchronous. We can make request to the server then process response whenever it is ready by handling event which is raised when request is completed.

In early days of the web applications and JavaScript, it was common to introduce a client side event handlers and JavaScript code inside the HTML tag. It was a model which allowed developers to implement the processing logic in browser but the main problem was too messy. The HTML code some times became unreadable and JavaScript code was hard for reusing and maintaining.

ASP.NET MVC implement the concept of unobtrusive JavaScript which means that by following principle of separation of concerns, this will keep JavaScript code separate from HTML code. The implementation of event handler and other functionality written in separate file which is referenced in the page.

Unobtrusive JavaScript is based on jQuery JavaScript library. It is free and open source. jQuery provides a simple method to find HTML elements such as <div>, <button> and form fields. Additionally, the jQuery includes a fluent API to manipulate and animate the elements and also implements wrapper to simplify the Ajax calls.

Jquery functionality is implemented by a layer which abstracts how browser works with the Document Object Model (DOM). It allows developers to have unified model of work whicheliminates cross browser differences. Developers need to know only one way to work with JavaScript and HTML elements and jQuery will do mapping to each browser implementation.

jQuery is the most popular JavaScript library available and is included in Visual Studio project templates for web applications. The ASP.NET MVC uses jQuery for implementation of its unobtrusive JavaScript features.
We can find jQuery library files in the Scripts directory of web application template as shown in Figure 1.

The library is located in jquery-[version].js file. Other three files mentioned in the box in Figure 1 are as follows:

jquery-[version].intellisense.js: It helps Visual Studio to display IntelliSense information.

jquery-[version].min.js: It is a minified version of JQuery that does not include comment or whitespace character and adds some other optimizations that reduce size of the file, so that this is transmitted to the browser fast.


jquery-[version].min.map: The source map file which is used to translate minified version of the library to nonminified version so that we can debug jQuery code from browser. (At the time of writing only Google Chrome was supporting source maps.)


Figure 1. jQuery is included in the Scripts directory of the web application

How to create Custom Data Annotations?

Major benefits of using data annotations is that we can create our own custom annotations. It allows us to reuse the validation logic in the different view models. It also allows us to keep the validation logic in centralized place to make it easier to maintain.

To create custom annotation, we need to create a class which inherits from ValidationAttribute and name of that class must end with suffix Attribute. For example, suppose we want to validate the name entered in From field is a full name (i.e. first name and last name available or not). Below steps will guide us through the process to create the custom data annotation:

1. Create one new class in Model directory and give name FullNameAttribute.

2. Include System.ComponentModel.DataAnnotations name space at top of the file
with rest of the default name spaces.

3. Make FullNameAttribute class inherit from class ValidationAttribute.

4. Override method IsValid.

5. Add  a validation logic to identify the value passed contains two words or not. It can be done by splitting the string by spaces as separator. The Split() method of String class return s an array of strings. So, basically all we need to verify if array has length of 2 or not. If it has length 2 then return true otherwise return false.


The code in Figure 1 shows result of previous steps to create a custom data annotation:


Figure 1. Custom Data Annotation to Validate Full Name Has First and Last Names

We can use above custom data annotation in our view model. Add it to From property with an error message. So, that user knows what the error is (as given below):

If we run the application, we will see different types of messages depending on the errors found. Example shown in Figure 2 below:


Figure 2. Validation error from the custom data annotation

Data validation process is integral part of the application. As a developer, we need to make sure that the data sent by user is valid. So that the application work properly. Validation process given in ASP.NET MVC can be implemented in many different ways but the simple approach is to use data annotations.

When we  implement the manual approach then we are responsible to implement the logic for which data should be analyzed and approved. It can be huge task and normally involves creating lot of code in action method to verify the data in view model is valid. This approach is not only prone to errors but also very hard to maintain and the validation logic can not be reused.

Using the data annotations is much better approach as the constraints are implemented using meta data directly in view model. The validation logic can be reused through many action methods. Also, by moving validation logic to view model instead of action method, the validation happens whenever the view model is used in entire application.

ASP.NET MVC supply a considerable number of validations attribute that we can use in our view model. But if none of them fits then we need it and we create our own custom data annotations by creating the classes that inherits from class ValidationAttribute and implement suitable IsValid method.

How to do Validation with Data Annotations?

The idea to use data annotation is to add constraint meta data to properties of the view model. The meta data then picked up by default binder when executes the model binding process and used to include additional validation to the data in the form field.

By adding constraints meta data to view model and allowing default binder to do validation as part of model binding process, we get certain benefits that is given below:

The validation rule is enforced across whole application and not just single action method.
We do not have to call method, instantiate class or do anything for the validation rules that need to be enforced, default binder will do this automatically.
The amount of codes that required to implement validation rules for annotations is
considerably very less than when do it manually.

Now modify the code to see data annotations in action. 1st, remove manually added validations and make action method then we will accomplish following tasks:

Make Form's Email and Message fields required.
Set maximum length of the From field to 100 characters which is the length defined in the database field. Same constraint will be applied to Email and Subject fields.
Set maximum length of the Message field to 2000 characters.
• Ensure that the email address is formatted properly.
Specify the custom error message for all the annotations for further helping user to fix errors.


The result is view model which shown in Figure 1. Note that all data annotations allow us to specify custom error message with ErrorMessage property.


Figure 1. Adding Data Annotations to the View Model

There are few other annotations that we can use to enforce validation rule in view model. Some will work at client browser and give the user immediate feedback and opportunity to fix entries before sending them to server.

Data Annotations List:

[CreditCard] => It defines the value as a credit card number which can have 15 or 16 digits without spaces or dashes.

[EmailAddress] => It indicates that the value must be well formatted email address.

[EnumDataType(typeof(name of enum))] => It enables .NET Framework enumeration that can be mapped to a data column. Its value must be one which is defined in enumeration.

[FileExtension(Extensions="")] => It validates the file extension of uploaded file which should be in the acceptable defined extensions. For example [FileExtensions(Extensions=".jpg,.png,.gif")].

[Range(min, max)] => It indicates that the value must be between specified minimum and
maximum range.

[RegularExpression(pattern)] => It indicates that the value must match specified pattern (regular expression).

[Required] => It indicates that the field must contain a value. The validation exception will be raised if the field is null or contains empty string (blank) or contains only white space characters. If we want to treat white pace characters as a valid character then we need to use [Required(AllowEmptyStrings=true)].

[StringLength(max)] => It indicates the maximum character length of the value can have and optionally, the minimum character length. Type of this properties should  be string.

[URL] => It indicates that its value is well formatted URL.

Now if we execute the application, we can see different type of errors in the browser
(client side code) as shown in Figure 2.


Figure 2. Validation errors of the form fields based on view model annotations

What is Manual Validation?

The first approach of validation is to validate data manually for each property in view model object when user submit a form. In this process the data of the form fields will be simply used to create view model object i.e. data binding then the object will be sent to the controller to process requests. This is the responsibility of developer to validate every property by writing the validation logic in action method.

Because the data binding already occurred and view model object is created, one step in the validation process and the data type check is completed. It is important as the data type check, while not so difficult, is tedious and repetitive task which takes a lot of developer’s time.

To see how the manual validation works lets take example, in the application the feature in
which user can send messages to pet owner. The view model shown in Figure 1 represents the message which is to be sent to pet owner using form in view.

This has four properties:

1. The name of the person sending the messages (From)
2. The email address of the person sending the messages (Email)
3. The subject of messages

4. The content of the messages.

Figure 1. View Model Class to Send Messages

Next, we need a controller to work with messages. Right click on the Controller directory in Solution Explorer window and chose Add => Controller. Put name of the controller like MessageController as shown in Figure 2 and chose “Empty MVC controller” from the Template drop down list and click Add.


Figure 2. Adding the Message controller

Now add some functionality to controller to validate and send message. Following steps will add initial functionality to perform manual validation:

1. New controller has a default action method known as Index. Rename action method to Send().

2. Add new action method, called Send() and add parameter named model with type
MessageModel.

3. Decorate new Send() action method to use the [HttpPost] method. It will instruct
controller to use this particular overloaded method of Send() action method whenever the
request is made by HTTP POST.

4. First validation used to ensure that the view model object is valid. We can do it by checking IsValid property of ModelState object. ModelState.IsValid tells us about the model errors have been added to ModelState. Default model binder adds some errors for basic
type conversions (for example, if passing a non numeric for any integer).

5. If view model object is valid then we will be redirected to another action method to render ThankYou view which tell the user that the message has been sent.

6. If the model state is not valid then we need to create an error message that should be rendered in the view for informing the user that something went wrong for the data submitted. To add error, use method AddModelError of ModelState object.

All steps shown in the code shown in Figure 3 below:


Figure 3. Message Controller

The ModelState.AddModelError() method requires two parameters. First one is the specific property from view model for that the error is generated. If error is not specific for a property in view model but it is a general error. We can pass empty string (as shown in Figure 3 above).

The second parameter is error description we want to show to the user. Next, let’s examine the code of the views. To create a Send view just right click some where in first Send() action method and then choose “Add View” option. The Add View dialog box will be opened (as shown in Figure 4. Name of the view should be Send.


Figure 4. Add View dialog

Check the “Create strongly typed view” check box for creating a strongly typed view and select the MessageModel class from “Model class” drop down list. If MessageModel class is not available in the list then we need to build application first with option Build Solution available in the BUILD menu or we can use shortcut keys Ctrl + Shift + B. From the “Scaffold template” drop down list, chose “Create” and leave rest of the properties with their default values. Choosing the scaffold template instructs that the dialog to create HTML form with fields corresponding to each properties from the view model class from the view. The code for the view is shown in Figure 5 below:

Figure 5. Newly Created Send View

HTML helper method @Html.ValidationSummary(true) returns unordered list (<ul>) with all errors from the model state. If Boolean parameter is set as true then the list of errors will include only the model level errors. If it is set as false then all the errors will be added into the list. Model level errors are not specific to particular property of the view model.

For example, errors that we added with the method ModelState.AddModelError() when the IsValid property was false.

There are many @Html.ValidationMessageFor() HTML helper methods available in view, one for every field of the form. Each of those helper methods is bounded for a particular field from view model. When any error is detected in form fields then these methods will be rendered a <span> element with specific error for the field for which they are bound. These error messages will be displayed automatically in browser before form is posted to server,
courtesy of neat JavaScript code that MVC inserted into web page when the page rendered the view.

Now create ThankYou view that will be rendered when validation test get succeeded and everything is fine. Create a view that does not have any view model and name it as ThankYou. In the <h2> tag, please modify the text to say ThankYou and add any sentence in <p> tag to indicate message has been sent as shown in Figure 6 below:


Figure 6. ThankYou View

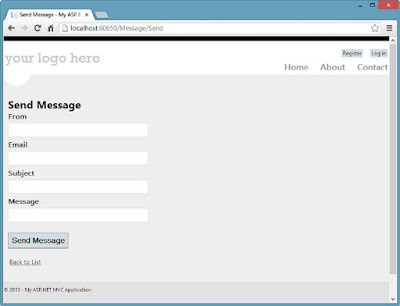
When we run the application and make request then the browser will render the view created above as shown in Figure 7 below:


Figure 7. Rendered view for the request

What is Data Validation?

User can make request using URL and send data to application by submitting form in a view which is handled by controller. However, a very important question that is not addressed is how to ensure whether the data submitted by the user is valid or not. The most important task to develop software include validation logic which ensures that data received from user is valid or not i.e. the application will work with it or not. The important task is also challenging for developers as they do not only ensure the data can be analyzed for validity but provide timely feedback to users which help to fix any invalid data and re-submit it again.

The Validation logic can be implemented not only in client browser to provide immediate feedback to users but in server as server can examine data using complex business rules. Another reason of implementing validation logic in server is, we never be completely sure that the incoming data (from network) is safe.

ASP.NET MVC has lot of built-in mechanism to implement client and server validation and to provide feedback to users. It will be used in the application to validate input from the users. For example, when we send message to pet owner or create new pet profile.

Validation Workflow

It is very important to understand that how validation works in order to provide user with best experience while ensuring integrity of the application.

Validation happen in two places: 1st in client browser and second at server. The steps in validation work flow are given below (see Figure 1):

1. In client browser when user submits data:

Verifies that the all required information is present or not.

Verifies that data format is correct or not. For example, verifies that data sent in e-mail
address field is well formatted, we must check that the form of e-mail address (name followed by symbol @ and followed by another name and end with a dot and more than two characters).

• Verifies data types as well (For example, a date field has valid date or not).

If anything is wrong at this point then the user will be given immediate feedback how to
correct the problem and information will not be sent to the server. So, the user can resubmit the request with corrections.

2. All client side validation test succeeded then the data will be sent to the server.


3. At server, second round of validation will be performed to enforce business rule and ensure that request is not an attack.

If there is any error then the request will not be processed and information about error will be sent back to browser. So that, user can make the necessary corrections.

4. Once all server side validations test succeed then the request will be processed and result will be produced (a view will be rendered or a file will be downloaded etc).


Figure 1. The validation process workflow

How to Add Entity Framework Model?

Following steps guide us to the process to add data model using Entity Framework through VS 2012:

1. Open up ASP.NET MVC 4 application

2. Now, create ADO.NET Entity Data Model using any one of the below procedures:

Right click on the Model folder and select Add => ADO.DB Entity Data Model, as shown in Figure 1 then type name of the data model and specify Name in Item dialog.


Figure 1. ADO.NET Entity Data Model of context menu


For example, enter DataModel shown in Figure 2 and click “OK” button for starting the Entity Data Model Wizard that will guide us through steps to create the Entity Framework based data model.


Figure 2. Naming the ADO.NET Entity Data Model

Alternatively, we can select Add => New Item. In the Add New Item dialog (see Figure 3) then click “Data” from the left pane and click “ADO.NET Entity Data Model” from middle pane. Enter a name such as DataModel in Name textbox. and click the “Add” button to launch Entity Data Model Wizard.


Figure 3. Creating the ADO.NET Entity Data Model via the Add New Item dialog

3. From Choose Model Content page of the Entity Data Model Wizard, as shown in Figure 4, we decide which approach to be used for the model: database first is “Generate from
database” or code first “Empty model”. In our case, model will be generated on the basis of existing tables from the database. So, select “Generate from database” and then click “Next.”


Figure 4. choosing the database - first approach of generating the data model


4. Next step of the wizard is Choose Your Data Connection, shown in Figure 5. The connection includes name of the server (or IP) where database resides database name and the connection credentials. Steps of this wizard given below:


Figure 5. Generating and saving the Entity Framework connection string

a. The wizard asks which data connection our application should use to connect to destination database. Only one option available in the drop-down list that is DefaultConnection, so we don’t need to change it. Connection was created by ASP.NET MVC 4 application and it is used to connect the Local DB where our table resides.

Alternatively, if database is not already created, you may click the “New Connection”
button to create new connection string. It opens the Choose Data Source dialogbox,
from which we identify the type of DB we are connecting to (for example, SQL Server or
Oracle). Available data source depens on the Entity Framework provider installed. By default, we have MS SQL Server, MS SQL Server 4.0, and MS SQL Server DB File. For example, we are connecting to a Local DB then select MS SQL Server Database File and click “Continue.” Add Connection dialog will appear. we can either browse for the DB file or, if we know the exact location then type the location in the box. Select how we are connecting, with Windows or with SQL Server Authentication. We can leave the default
settings which is Windows Authentication. Now click the “Test Connection” button at the bottom of dialog to test connection. We should get a message “Test connection
succeeded.” then click “OK.” If we don’t get this message then something is wrong with
 configuration and we should review entered values. Now click “OK” to finish the new connection. New connection will be available in drop-down list as shown in Figure 5.

b. “Entity connection string” section in the wizard steps preview the Entity Framework connection string which is generated based on database selection.

c. The check box at bottom of this steps give us choice of saving the Entity Framework connection string in Web.Config file. It is generally good idea to select this
option as it ensures that our connection string is defined at one place in application, which make it easier to maintain in future. So, check the box and enter name EntitiesConnection in field below it.

d. Click Next to proceed to next step of this wizard.