Translate

Unit Testing

Unit testing is not a new concept. The basic idea is to create a program which will make certain assumptions for a specific piece of code in our application and determine, based on those assumptions, the code produces an expected result or not.

Defining a Unit Test

The program which will perform test is called unit test. An excellent definition of a unit test is:

Unit test is an automated piece of code which invokes method or class being tested and then checks some assumptions about logical behavior of that method or class. Unit test is almost always written using a unit-testing framework. It can be written easily and runs quickly. It is fully automated, trustworthy, readable and maintainable.

A key concept in above definition is that each unit test must test one and only one, behavior of the functionality being tested. For example, a method which returns an object based on the id. The method can behave in either of two ways - If it finds the object with the specified id then it should return the object. If it does not find the object then it should return null. As the method has two behaviors, we would write two unit tests: first to test the case where it finds the object and second to test when it returns null. It can lead for writing many unit tests for a single piece of code. It is okay to have many unit tests, in fact, it is expected. Unit tests are executed automatically and are very fast. So, it does not matter how many test cases we have.

Also, we should not delete unit test just because it succeeds. We should delete a unit test only if we have removed from the application the corresponding functionality being tested. It will ensure that we can run the test each time we add new functionality or make any change in the application by ensuring nothing has been broken by the addition or change.

With Microsoft Test Framework, we can create unit tests as methods which are decorated with the [TestMethod] attribute. The methods must be in a class which is decorated with the [TestClass] attribute.

Structure of Unit Tests

One of the most common patterns which should be followed when writing unit tests is the AAA pattern, in which we write our unit test in three parts:

Arrange: Set up the unit test. For example, we initialize variables and objects so that they are ready to pass in code to be tested.

Act: Invokes the code we want to test. It means invoking a particular method which we are trying to test.

Assert: Analyzes result produced in the Act part. We might verify the return value and any output parameters are what we expected.

Isolation

Another important aspect of unit testing is that it should properly locate the source of problem when it arises. By using unit testing, although we are testing only small pieces of code, we should do the tests in an isolated environment. It is very important to isolate our code from external resources out of our control (databases, web services and file system etc.) as

The resources might fail for unpredictable reasons.

The data yielded by such external resources might be unpredictable and non-repeatable (which really ruins the unit tests).

The resources might not actually be available yet in our development project.

Additional benefit of testing in isolation is that we can test our code even if the external resources are not ready to interact with it yet. Suppose we are working as a team and our piece of code has a dependency on some piece of code from a colleague but that colleague has not completed the piece of code yet. Or suppose our code has a dependency on a completely external component (from a third party or trading partner).

In either case, by isolating our code, we do not need to worry about those dependencies. We can move forward with our development and be ready to go when the rest of team is ready.

Naming Unit Tests

An ignored aspect of creating a good unit test is its name. Nothing prevents us from naming our unit test something as generic as Test1(), it will hardly give us any useful information. A common practice is to name our unit test in a manner which gives developers as much information as possible when the test gets fail. A good pattern of naming unit tests is to concatenate the name of method being tested, the key assumptions and expected result. For example, UploadFile_ValidFileSpecificied_SizeOnServerOverZeroKb().


Properly naming the test classes is also best practice. We should use same name as the class to be tested and suffix Test. For example, HomeControllerTest - which raises an interesting MVC-related point: we can perform unit tests on controller classes.

Cross-Site Scripting Prevention

Cross-site scripting is vulnerability in web applications which allows hackers to inject JavaScript code in the form fields whose values are not sanitized properly. These values are either saved in database or executed later when they used in other areas of application or displayed immediately in page. As defined by Open Web Application Security Project (OWASP), there are two types of attacks classified as stored XSS and reflected XSS, respectively.


To understand XSS better, let us take an example. We allow users to send messages to pet owners. At this point, if user tries to add HTML tags to the message then the user gets an error as shown in Figure 1. This error is throwing because ASP.NET verifies all input fields to prevent XSS and by default does not allow users to post any HTML tag to server.


Figure 1. ASP.NET prevents XSS mechanism and disallows HTML post to server

Now, if we really need to allow the users to post the HTML tags to server then we can modify behavior by adding ValidateInput as false to the send action method as shown in Figure 2. The problem is that it will disable all the XSS validation for all fields.


Figure 2. Disabling All XSS Validation

Better approach is allowing the HTML tags in specific fields. In this example, only field in which we allow HTML tags is the Message field. To achieve this, we need to remove ValidationInput = false attribute from action method and add AllowHtml attribute to the field in the view model as shown in Figure 3. We have modified the send view to show the values posted after user sent the message. When user sends the message then we get result shown in Figure 2.


Figure 3. Allowing HTML Tags in Message Field

The application has opened one door to let users enter HTML tags, including <script> tags. The user can enter <script type="text/javascript">alert("Evil Script");</script> in the field and the result will be as shown in Figure 4.


Figure 4. JavaScript injected in Message field

WebKit based browsers like Google Chrome and Safari have integrated XSS validation module which is called XSS Auditor which can prevent execution of <script> tags. The Chromium Blog article “Security in Depth: New Security Features” describes behavior of XSS Auditor at the time known as XSS filter as follows:

XSS filter is similar to the ones found in Internet Explorer 8 and NoScript. Instead of layered on top of browser like those filters, the XSS filter is integrated into WebKit, which Google Chrome uses for rendering the webpages. Integrating XSS filter into rendering engine has two benefits:

1. The filter can catch scripts right before they executed, making easier detection some tricky attack variations.
2. The filter can be used by all WebKit based browser, including Safari and Epiphany.

Google Chrome also acknowledges that there are some other ways of bypassing the XSS filters. However, it is always improving the technology, so over time these scenarios should be avoided.

For example, In Google Chrome, message entered previously produces an error in developer tool console as shown in Figure 5.


Figure 5. XSS Auditor module in Google Chrome

Simple Membership Configuration

Simple Membership introduced with ASP.NET Web Pages and Web Matrix for simplifying task of authenticating users. Idea behind it to use a minimalistic schema which can be easily customized to fit needs of application. With Simple Membership, we can overcome the issues of full Membership System such as limited to SQL Server or Active Directory. The rigid schema and extreme difficulty of integrating external sources like OAuth and OpenID.

To use Simple Membership, we need a connection string pointing to database which will store user accounts. The configuration of Simple Membership happens automatically with first request to Account Controller class. It also pointed out that Account Controller class is decorated with [InitializeSimpleMembership] attribute. Under the hood, [InitializeSimpleMembership] attribute is calling the following command:

WebSecurity.InitializeDatabaseConnection("DefaultConnection", "UserProfile", "UserId", "UserName", autoCreateTables: true);

The code is in the Filters/InitializeSimpleMembershipAttribute.cs file, which implements the [InitializeSimpleMembership] attribute.

InitializeDatabaseConnection() method instruct the web application to use database configured in DefaultConnection connection string defined in Web.config. The connection string points to Local DB we are using. The second and third parameters in InitializeDatabaseConnection() call are the table and primary key column where user accounts will be stored. The fourth parameter is column in table which stores user name that identifies each user account. The fifth parameter defines whether the Simple Membership tables will be created if they are absent in the database.

Using the ASP.NET Simple Membership API

ASP.NET Simple Membership includes API which can be used to programmatically to perform operations on user accounts like creating or deleting accounts. These operations are encapsulated in methods located in WebSecurity class in the WebMatrix.WebData namespace.

Visual Studio already created code which handles common operations like validation of user credentials and changing passwords in AccountController class. That’s why the action methods in AccountController class use the methods in the WebSecurity class to handle such operations.


The methods which handle the most common tasks of user account using Simple Membership are listed and described below in Figure 1:


Figure 1. Common methods in ASP.NET Simple Membership API

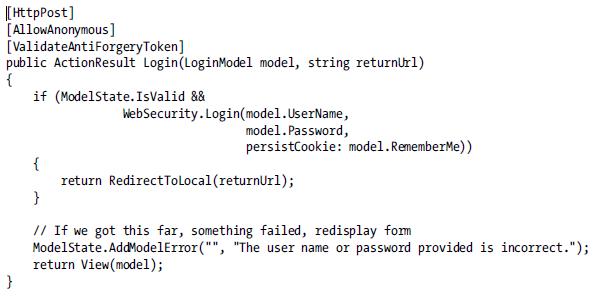
For validating user credentials using Simple Membership, we use the Login() method in the WebSecurity class as shown in Figure 2. The Login() method takes three parameters: 1st is username, 2nd is password and 3rd is a Boolean parameter which defines behavior of authentication cookie.

Figure 2. User credentials validation using ASP.NET Simple Membership

Using the ASP.NET Membership API

ASP.NET membership having complex schema than SimpleMembership. Once configured, we can use Membership API to manage user accounts to create and delete accounts, assign accounts to roles, etc. ASP.NET Membership API is defined by methods in Membership class in System.Web.Security namespace as the default membership provider in Internet Application template is now Simple Membership.
Visual Studio does not generate any code which implements this API.

As usual, we would implement user functionality in action methods from a controller. The code is similar to the code implemented with Simple Membership but the method names and parameters are slightly different. Figure 3 lists and describes most commonly used methods in Membership class.

Figure 3. Common Methods in ASP.NET Membership class

Following are the typical process which occurs when user logs into the application:

1. In login page, user enters user name and password.

2. The login page posts entered credentials to server.

3. The server validates credentials against user account in database.

4. If record found in database then a cookie with security ticket is issued and if no record found then an error is returned to user.

Using ASP.NET Membership API, code is bit different. We use the ValidateUser() method in Membership class. The ValidateUser() method takes two arguments user name and password and returns a Boolean value which indicates whether the validation was successful or not. If validation was successful then previous authentication cookie is removed and a new authentication cookie is created using SetAuthCookie() method in FormsAuthentication class. The codes shown in Figure 4 implements ASP.NET Membership API to validate user credentials.


Figure 4. Validating User Credentials Using ASP.NET Membership API

We can use the CreateUser() method to create user. The method returns object of MembershipUser type.

Example:

MembershipUser oMembershipUser = Membership.CreateUser(model.UserName, model.Password, model.Email);
oMembershipUser.FirstName = model.FirstName;
oMembershipUser.LastName = modelLastName;
Membership.UpdateUser(oMembershipUser);

If we are using the Simple Membership API then the WebSecurity class has a CreateUserAndAccount() method which allows us to create new user and account as follows:

WebSecurity.CreateUserAndAccount(model.UserName, model.Password,
new { FirstName = model.FirstName,
         LastName = model.LastName,
        Email = model.Email },
false);

In this case, we pass additional properties FirstName, LastName and Email as anonymous object to CreateUserAndAccount() method. So, database table is filled with the information.

In case of Membership.CreateUser(), method returns a MembershipUser object and we need to use the object to set values in FirstName and LastName properties and finally, we call Membership.UpdateUser() to save values in database.